Thursday 12 May 2016

Week 14 (FYP2) : Presentation FYP2

Objective for this week: this week is final presentation for FYP2.

For this week, i ready to present and my project trolley follower already done and function properly. for the presentation i will assessor with 2 lecture first  NORHASLINAWATI RAMLI and second lecture is KAMALULFAIZIN MOHD SUHUT. for presentation i constantly ready to answers all question to ask me. Alhamdullilah i finish all presentation successfully. 


Monday 2 May 2016

Week 13 (FYP2): Design poster,preparation presentation and FY2 briefing.

Objective for this week: design poster and preparation for presentation FYP2.

This week I design posters and meet madam Azliza for preparation for presentation FYP2. and madam Azliza give some tips for later presentation.

1. Below show my design poster 

In poster include explanation about:
  1. Objective
  2. Product description
  3. Methodology
  4. Flow chart
  5. Result
  6. Conclusion
  7. Reference
briefing for this week focus about presentation and what needs to be there on the day of presentation.


Thursday 28 April 2016

Week 12 (FYP2): Test all function of trolley follower

Objective for this week: I test the function of the moving trolley, component, system coding and find little new form so that the trolley is always stable in the presentation later.


The above picture shows the entire project completed posted trolley follower including coding system that can control the movement of the trolley follower.

Here I will describe each function in the trolley follower:

1. Arduino Uno 
Arduino Uno function is to control the trolley follower, mean this Arduino is main function to control all component in trolley follower.


2. Ultrasonic sensor
Ultrasonic sensor is input device, ultrasonic sensor function here is to get the information or the movement of a human being and will send this information to process the system will be sent to the Arduino UNO.

3. Motor 
Motor function to movement the trolley follower.


4. Battery
for this trolley follower, i sue two battery, first for Arduino Uno and second for control the motor. 
for arduino i use 12V, 1.2Ah. for motor i use 12V, 7.2Ah because motor use 12v and 60rpm, so supply larger than arduino.


Sunday 24 April 2016

Week 11 (FYP2): Addition component and modified the coding

Objective for this week: go to JALAN PASAR buy new addition component and set new coding for addition component and test burn the coding to hardware.

1. first go to JALAN PASAR buy the component:

component have buy is:
  • switch 
  • cable jumper
  • L298 motor drive module
  • Donut board
2. second addition and edit the coding for motor controller, below picture show the coding:
by coding the above, I have made ​​some changes in the coding of the motor controller. Here I have added two motor coding, including one to move to the left, while the other one to move to the right.
On motor coding I have set the appropriate speed and distance is suitable for both motor.

this week, I've added coding hardware and repair coding motor controller.

Monday 18 April 2016

Week 10 (FYP2): Modified harware and second briefing

 Objective for this week: This week I made ​​some adjustments and additions to the my project hardware with a new idea and it looks better. for this week have a second briefing.

1. below show my additions for my project trolley follower.

this i use for connection ultrasonic sensor and design for stability of my motor. i use pipe, iron and perspex.

This for all connection when addition new hardware part.

2. For this week have a second briefing :
  • Explanation about poster
  • Explanation about the Thesis for FYP


Wednesday 13 April 2016

Week 9: Welding Motor and construct hardware

Objective for this week: for this week i go to welding shop to welding my motor and set all construct hardware of trolley follower.

1. first i go to welding to welding connection my motor drive to control the wheels for my trolley follower.
below show the welding motor:

This picture show i go to shop welding for welding my connection motor to control the trolley movement.

2. below show my construct my hardware for trolley follower:

first drill board and design connection drive motor to motor controller.
this design for connection ultrasonic sensor.

This all connection design.


For this week I did all the connection components to do experiments on every function, including board test, test and test ultrasonic sensor motor. for this week i go to welding my motor connection.


Saturday 2 April 2016

Week 8 (FYP2): Design connection motor driver to arduino and choose best wheels for trolley follower.

Objective for this week:  for this week design for motor drive, how many inputs and outputs needed to control the arduino and also controls motor movement system to run the trolley. This week also choose the right tires for use in the movement of the trolley.

1. The figure below shows the design for motor drive use PROTELL99SE.


In motor drive, use a 12 V or 9 V by the heavy load trolley, trolley follower but to use 12 V in order to move the trolley follower. By using two motor left and right and has been set to arduino distance and speed of the motor movement.
Motor drive will detect two signals from the arduino ultrasonic sensor signal of the left and right. based on the signal, the motor will move according to the distance and speed set assigned.


In arduino have code Writes an analog value (PWM wave) to a pin. Can be used to drive a motor at various speeds. After a call to analogWrite(), the pin will generate a steady square wave of the specified duty cycle until the next call to analogWrite() (or a call to digitalRead() or digitalWrite() on the same pin). The frequency of the PWM signal on most pins is approximately 490 Hz. On the Uno and similar boards, pins 5 and 6 have a frequency of approximately 980 Hz. Pins 3 and 11 on the Leonardo also run at 980 Hz

Monday 28 March 2016

Week 7 (FYP2) : Buy Battery and combination of coding for this trolley follower

Objective for this week: For this week I buy the battery suited to control the movement of the motor and combination coding of detector sensor and motor to movement of trolley follower.

1. below show battery that will be used for trolley follower. i use 2 battery, first for ARDUINO UNO and second for control the motor.

this battery for ARDUINO UNO, use 12V, 2AH. for ARDUINO voltage supply low better than Supply for motor drive.

this battery for motor drive to control movement of trolley follower. use 12V, 7.2AH. for motor drive voltage supply high better than supply for ARDUINO UNO.


Wednesday 16 March 2016

Week 6 (FYP2): Draw and design schematic circuit for trolley follower

Objective for this week: for this week I draw the circuit and test all component function for this trolley follower.


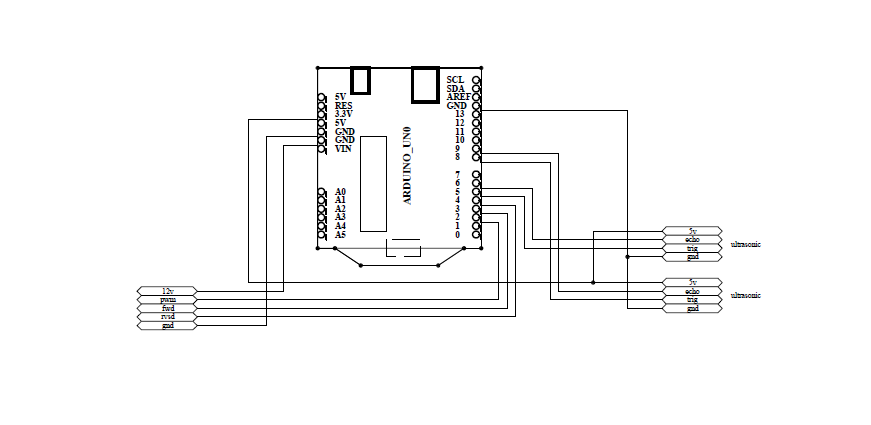
1. Draw the schematic diagram using PROTEL99SE.
software for design schematic


This schematic diagram circuit for trolley follower

for this schematic circuit for this project, I use 2 of sensor ultrasonic and 2 motor for control movement of trolley follower when the trolley moving with customer.

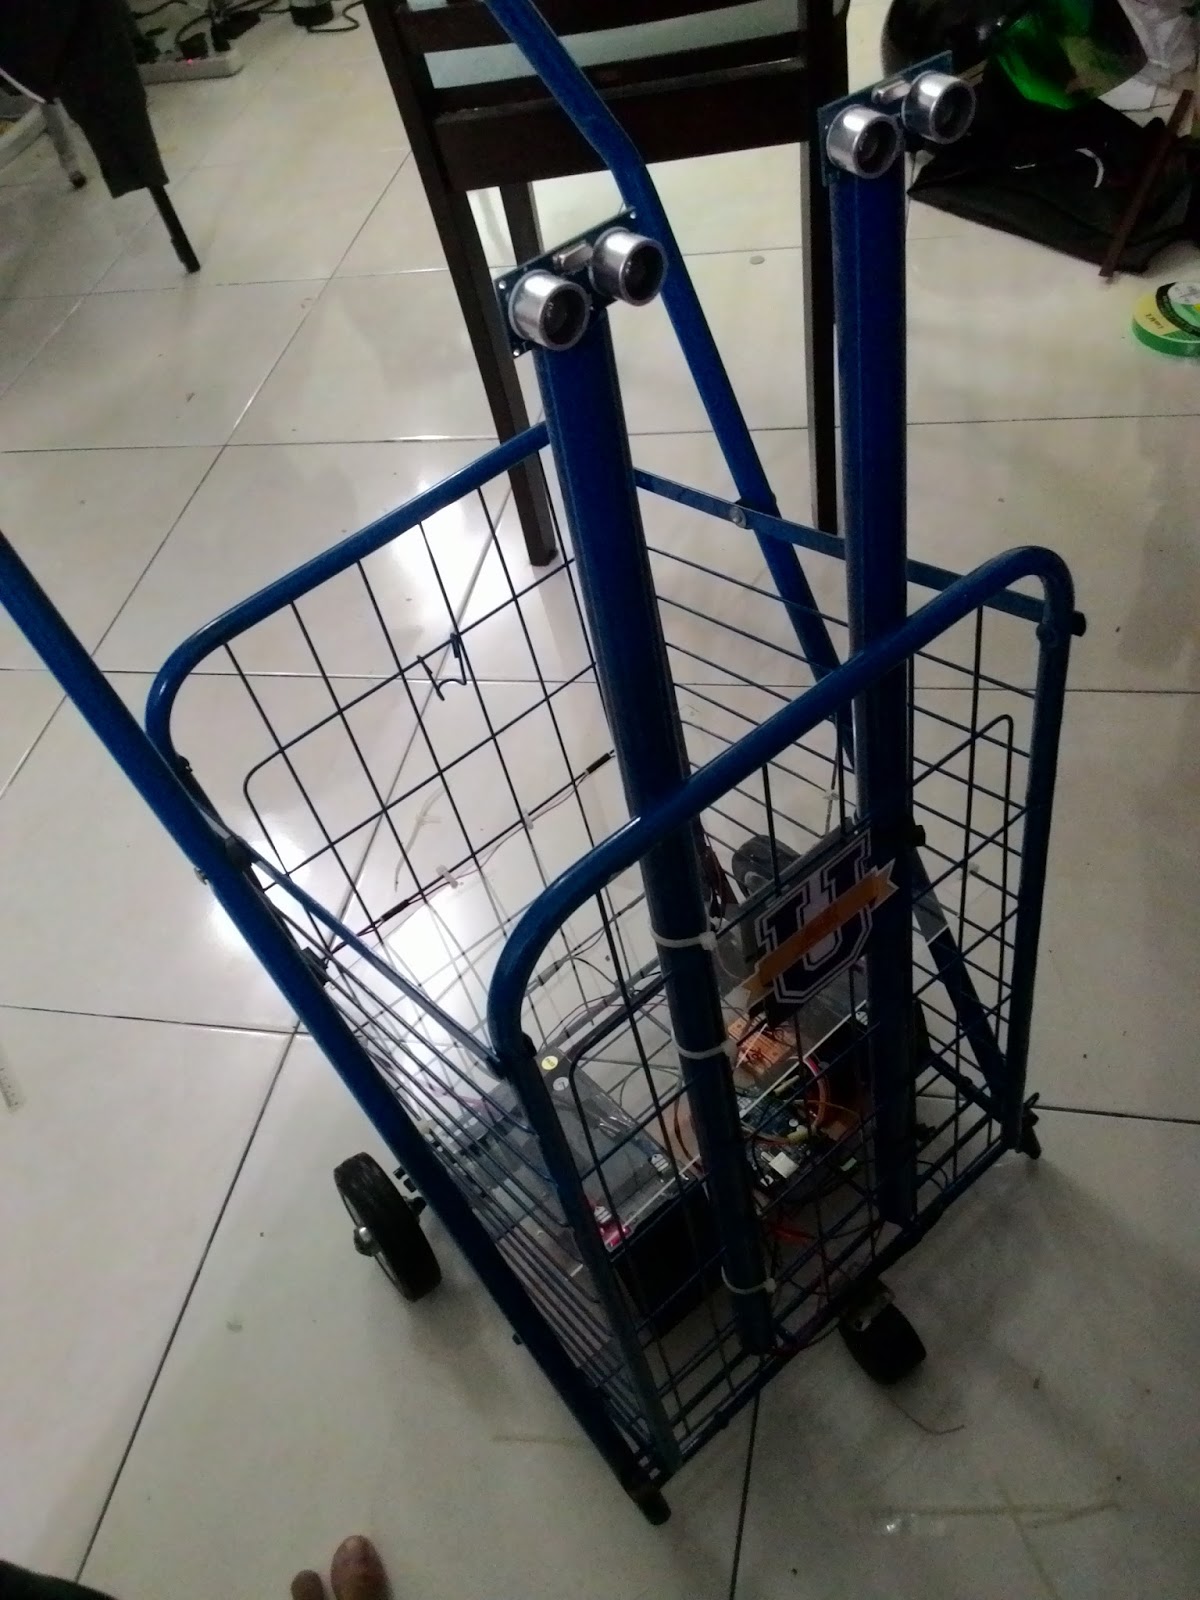
2. Test all component for this trolley follower.

I test arduino, sensor, resistor, capacitor and all component to test performance and function or not of all component.


this picture for time test all component
In arduino code Write a HIGH or a LOW value to a digital pin.

If the pin has been configured as an OUTPUT with pinMode(), its voltage will be set to the corresponding value: 5V  for HIGH, 0V (ground) for LOW.

If the pin is configured as an INPUT, digitalWrite() will enable (HIGH) or disable (LOW) the internal pullup on the input pin. It is recommended to set the pinMode() to INPUT_PULLUP to enable the internal pull-up resistor.


Saturday 5 March 2016

Week 5 (FYP2): Buy trolley and Testing Motor

Objective for this week: For this week I go to hardware stores to buy the trolley and testing function motor.

1. Below show the pictures and price trolley:


Trolley to be used for final year project and based on the pictures, for the tires will use a motor to move the trolley.


2. Below show the motor i use for my FYP trolley follower:

for my project i use 2 motor left and right. for this motor support 12 V supply, rpm 60 speed. this motor can control movement of my trolley follower. can move to forward, right and left. 


Friday 26 February 2016

week 4 (FYP2): Briefing for FYP2 and buy component

Objective for this week: go to the briefing for FYP2 and buy new component for design and test the circuit for trolley follower.

For the briefing was meant to give some explanation to all final year projects 2 student. The briefing is about: 
  • Introduction
  • Objective
  • Credits and duration
  • Scope of project
  • Title selection
  • Project assessment
  • Presentation day
  • Submission date of project
for buy new component, i buy for this component and equipment:
  1. board
  2. usb cable
  3. jumper
  4. mini board


Friday 19 February 2016

Week 3 (FYP2):Test Ultrasonic Sensor Distance

Objective for this week: For this week I test ultrasonic sensor using ARDUINO for check the distance and set the distance for ultrasonic sensor function.  First, using a check arduino to detect and set up which can be set and the result will be available on the system monitor screen serial arduino. 

1. first test result output to show the monitor in arduino:


In the picture above there is a reading on the test and the distance sensor on the display.


2. Second test sensor using real situation for test the distance of sensor:

This below show circuit testing sensor ultrasonic:


The 5V pin of the ultrasonic sensor is connected to the 5V pin on the board, the GND pin is connected to the GND pin, and the SIG (signal) pin is connected to digital pin 7 on the board.

This below show schematic testing sensor ultrasonic:

This video is about to testing distance ultrasonic sensor:


Friday 12 February 2016

Week 2: Change Microcontroller and buy new microcontroller (Arduino)

Objective for this week: Change microcontroller from ATMEL AVR 8- bit to ARDUINO UNO and test ARDUINO UNO function.

For this week i do and test microcontroller. First i try microcontroller ATMEL, microcontroller ATMEL is complicate then I meet my advisor and I discuss to better microcontroller. I decided to use microcontroller ARDUINO UNO because ARDUINO is easy better then ATMEL.


Step to test function ARDUINO UNO :

1. Install ARDUINO software


2. Test design ARDUINO UNO in proteus


3. Write basic coding ARDUINO UNO to test ultrasonic sensor.


Saturday 6 February 2016

Week 1 (FYP2): New semester and update latest progress

Objective for this week: To update latest progress to the FYP advisor

For this week I met with my advisor and discuss progress for FYP2 and what should I do for this semester to complete my FYP2.
I discuss for my project and now i prepare to order this component to start my project, 

The list component i need to buy is:

1. Sensor
2. Microcontroller
3. Equipment = Trolley, Motor, and tyre controller.

Conclusion : For the conclusion on this week, i have meet my supervisor to manage the  meeting time with him and also i have get a permission from my supervisor about the idea to finalize the component that i need to use for my FYP 2